Tuesday, September 1, 2020

Worm Fancy Closes Its Doors in Sacramento

Worm Fancy has been serving the Sacramento area for over 10 years and it is time for the next adventure.  I am trying to not be sad for this small business, but instead be happy for all the people that we got to expose to the world of worms and worm composting.  I am grateful to our current team partners like the City of Sacramento (Thank you Doug Huston), Sacramento Community Gardens (Thank you Bill Manord), Green Restaurants Alliance Sacramento 'GRAS' (Thank you David Baker), Republic Services (Thank you Annah Rulon, Anthony Smith, Brandon Colldeweih) and Living Resources Company (Thank you Steve Zien).  We also had support from the folks at CalEPA, Soil Born Farms and  the Sacramento Zoo.  There were also countless teachers and parents that got us into so many classrooms and in front of children from pre-school through college.  Honestly after 10 years the list is so long I can't even begin to mention everyone.  The group of people here that I was blessed to get connected with has been life changing.

Our dream of being Homesteaders is finally starting to happen as we are about to close on 100 acres in Oregon.  It has been over 10 years since we have been growing food on our tiny 1/16 of an acre in the Sacramento Suburbs.  We obviously compost a huge amount of waste and I feel so proud when our trash can has one bag of trash for our family of 4 per week.  We put in rainwater collection systems where we could store over 1200 gallons of water for our gardens.  Speaking of gardens, we pulled out all the trees that were not multipurpose (shade AND food) and planted mandarin and a fruit basket tree.  We traded our front yard lawn for two huge garden beds made from recycled broken concrete.  We pretty much tucked in growing beds every place we could.  I even had my husband build me bunk beds so I could grow on multiple levels (strawberries on the top, greens on the bottom).  

I'm so looking forward to grow food on a real scale as well as have an orchard with a variety of different types of fruit.  My oldest daughter has been studying about healing herbs and is super excited about making her own tea.  She has already commissioned the building of her own 'Tea Shed' where she can do her own drying and processing of tea.  My younger daughter is flat out excited about getting a dog.  She has always loved animals and all creatures.  She has been happy to have small pets but is ready for larger animals that will help us out on the farm.  My husband is excited about finally having the opportunity to build a cabin.  With trees and land it seems like we are all going to have the opportunity to fill some lifelong dreams.

So while leaving our wonderful community here in Sacramento is very sad we are stepping into a very exciting chapter of our lives.  I will keep this website up and my email active so all the composting and worm information is still available.  If you need help I am here via email to do what I can.  

Happy Composting!

Kate & Richard Waldo

Tuesday, June 30, 2020

Worm Season Comes to an End

Due to the high demand we are finally OUT OF WORMS. I love that so many folks have finally made the jump to doing worm composting.  Worm Fancy sold more worms in this spring than we have ever sold in the past 9 years of selling worms. 

We will likely be ready to sell worms again in October 2020.

Happy Composting!!

Rich & Kate

Saturday, September 1, 2018

Adding Worms to the Garden

I recently got an email from a woman who had just moved to a home with soil "that is dust when dry and soggy/spongy when wet and devoid of all discernible  living organisms."  She was looking to give the space some love and turn this soil into a garden to grow flowers, trees and vegetables.  Her question to me was if red worms can be added to the soil directly.  The short answer is yes, red worms can be added directly to the soil.  The more complex answer is directed to the home that you will be putting them into.  The soil was described as dusty and devoid of life and that doesn't sound very hospitable for your new friends.  The red worms will only stay if you encourage them to want to stay.  Making sure the the area you add the worms to is actually ready to support worms.  

If you have an area that you are planning to garden in you can start adding some of the basic building blocks of life very easily.  The first step needs to be growing microbes.  The microbes are mostly made of water so the area will need to be moist.  You could start this project when it starts to rain so you are not using city water to get it moist.  Given that city water has residual chlorine in it intended to kill microbes so that us humans don't get sick, it is pretty much the opposite of what you are trying to do.  I would cover the soil with at least 4 to 6 inches of mulch.  The best type of mulch is is by far leaves but straw will do in a pinch.  Save the leaves when they fall in autumn for your composting and gardening needs throughout the year.  It would be best if you could mulch the leaves first.  I like to rake the leaves on to the lawn and 'vacuum' them up with the lawn mower.  I also have a leaf blower that has a mulching option.  I have even heard of people putting the leaves into their green waste can and using a weed wacker to kinda blend them up in the bin.  That option sounds a little messy but whatever your method the point is to get the leaves into smaller pieces. 


Just covering the soil and having the rain perk through the leaves will begin the process of adding life into the soil.  We want this to really get going so the next thing I would do is to make it inviting to the larger creatures that feed on the microbes, like worms and others.  You could take your kitchen scraps and either bury them in the soil or just spread them out on top of the soil and cover with the 4 to 6 inches of leaf mulch.  The kitchen scraps will not only add organic matter to the soil it will add carbon and nitrogen as well as many other nutrients that plants will need to be healthy.  Keeping the kitchen scraps covered is the key to not having any odors or other nuisances like flies.  After doing this for a few weeks you could add the worms.  Red worms generally live in the top 4 to 6 inches of soil so they will go up and down as the temperatures change and the food supply is added to the garden.  You can continue to spread your kitchen scraps to the garden even after you plant.  It happens to me that I will have surplus food that my worm army at my home cannot handle so I will spread it in my garden covering it with lots of mulch.  When I go back just 4 or 5 days later it is gone and all that is left is beautiful rich soil and worms eating the mulch.
 
Worm castings is another way to boost the microbes in the soil and to quote a horticulturalist friend of mine Steve Zine, you want to use as much castings as you can afford.  I am lucky to run in circles with many people that know a lot about soil and gardening.  Every time I would go to Steve and ask him about some problem I have in my garden he would tease me and tell me 'See if you can find some good quality worm castings'.  Of course he knew I grew worms and had plenty of good quality castings, the point was that even I could use more of them.  It is currently September and the summer growing season is coming to an end but now is the perfect time to use them.  Fresh worm castings are full of those microbes you are trying to inoculate your soil with.  If you add them to the soil, cover them with that mulch, and allow the winter rains to peculate the castings into the soil it will bring life to the soil.  I have seen castings added to the top of hard clayey soil in the fall turn the soil into beautiful loose soil by spring.  I know it sounds like magic but it is the microbes bringing life to the soil.

You don't want to stop the magic so you want to use castings when you prepare the soil for planting, use them when you plant and also use them around the established plants.  Remember that city water with the residual chlorine killing the microbes? You will need to keep adding microbes to the soil to keep the plants and soil healthy.  Mulching and using your kitchen scraps will encourage worms to live in the soil so they will be constantly be adding fresh microbe rich castings.   

Sunday, July 9, 2017

What To Do With Wet Castings

After the many years of drought I think that Californians were not allowed to complain about any rain that we got... but last winter we got A LOT of rain. It was wonderful to have full rain barrels and my garden didn't need to be watered, but there becomes a point when enough is enough.

One of the consequences of all this rain was that my outside bins were quite soggy.  I cover the bins with plastic to keep the water from dripping into them but I didn't consider that my yard would actually flood and they would get soaked from underneath.

I got the bins put up on bricks so they would drip dry but even when the dripping stopped the castings were still like mud.  I have several Rubbermaid bins that hold a lot of water and usually I just add more dry bedding, like shredded newspaper or tore up egg cartons, to soak up the excess moisture.  This works as long as I am not looking to harvest the castings.

In order to harvest my soggy castings I decided I needed to dry them out enough to to be able to sort out the worms and also dry enough to sift. This process would be impossible to do in the mud like state they were in.


What I did was line a mason tray with two egg flats and pile the soggy castings on top of them.  I alternated a layers of egg flats and castings till I filled the mason tray.  I let it sit there for two days then I transferred the castings into another tray with more dry egg flats.  I tore up the soggy egg flats and used them as bedding for a new bin.


The process took a total of four days and after the second time using dry cartons the castings were dry enough to manipulate.  I was able to proceed with my normal process of light sorting the worms and then sifting the castings through a 1/4 inch sifter.

If you are ready to harvest your worm bin and the castings are too wet to work with, this process should help get them to a moist but not muddy point so you can to use them more easily.

Sunday, January 19, 2014

Light Sorting Worms


If you are operating a Rubbermaid type of worm bin (and not a vertically migrating system like a Worm Factory 360) you will eventually need to harvest your castings.  Once you have had a worm bin operating for several months all the paper products you used as bedding material will have disappeared and the bin will  look like it is full of dirt.  The dirt is all the worm castings (worm poop) that is so valuable for plants.  The big question becomes how do I harvest my castings.  There are two basic ways to harvest castings... a fast way and a slow way.  The slow way is to feed your worms in one corner of the bin and then several weeks later most of the worms will migrate over to the food.  This will allow you to scoop out the castings from the opposite side and replace them with some fresh bedding material.  This is all fine and good if you are not in a hurry but you may be like me and super busy, and since I only get a small window of time to work on projects I enjoy, I would like this process to happen much faster.  

The fast way is called harvesting by Light Sorting.  The idea is to take advantage of the worm's natural desire to dive away from light.  I have described this process over and over to folks and the premiss is very simple but I thought it would give folks more confidence if they just watched the process in a video.  So I put together a short 7 minute video to help new worm bin owners harvest their castings.

The video link is included below but it is also accessed directly on YouTube by searching for WormFancycom (just like our website without the 'dot').  I hope that it gives you the confidence to light sort your worms so you don't have to wait on lazy worms and can have your castings whenever YOU are ready for them.

Harvesting a Worm Bin

Wednesday, November 28, 2012

Winter Worm Composting

Now that winter is upon us and the temperatures are definitely dropping I have been taking measures to winterize our worms… and thought I would share some of the efforts so that perhaps more worm bins will stay alive and active over the winter. This brings up a very important distinction between just keeping your worms alive (keeping them above 40 degrees F) and actually having an active bin that continues to process food waste and create castings. Personally I want to keep all my bins active so that come spring we have lots of worms and castings for my own garden and for those of you that want to come and pick some up from us. That being said I will be focusing this posting on keeping the bins active with a temperature goal around 70 degrees F.

The easiest way to keep a worm bin active is to keep it inside. It is a constant temperature all year long, no need to cool in the summer or to heat in the winter. If the bin is kept well you won’t be overrun with insects and there will not be any unpleasant odors. Many people find unused corners of their houses that can fit a worm bin. My mother keeps her worm bin right next to her trash can in her kitchen and has never had a challenge. But perhaps keeping the bin in the house is not an option. For me I have far too many bins to bring them all in the house so I need to find other alternatives.

To keep your bin warm enough you will need to provide a heat source and insulation. If you just want to keep your bin alive insulation alone may be sufficient, but since I want to keep my bins active I need to find a heat source as well. A natural, microbial heat source is preferable. I have three large outside bins which I insulate with a layer of mulched leaves and a thick layer of shredded paper. I also cover the bins with plastic to keep the rain out and the heat in. It would be cool if I could have put the bins into the ground to provide additional insulation but we have an impossible hardpan so we are stuck with above ground bins and garden beds. The food you add will add heat but make sure you let the worms be your guide… they may be slowing down on their food consumption so the feeding frequency may decrease.

If the food and insulation doesn’t create enough heat you will need to look into alternative heat sources. For my inside bins I have several layers of Christmas lights on the rack. If you have just one bin you could set the bin on some bricks and put a wad of lights under the bin. You could drape a bin with lights. When I only had one bin I would put a heating pad under the bin for a few hours to get it warmed up. Monitor the temperature because if you have too many lights or a heating pad you can get the temperature way too hot. I have also placed sheets of plastic around our rack to hold in the heat we generate with the lights. This seems to keep the space in the 60’s without any challenge but our goal is 70 so now we have to get creative… More lights may be the option we go with eventually but for now we have been running a space heater while we are working on worm projects in the evening to get the temperature up.

 I have tried several other options in the past that could work if you only had one bin to work with. When I had one bin outside and I wanted it to stay warm I put a glass juice jar filled with water in the middle of the bin and would replace the cool water with warm water every day. Even though I was a pretty die hard worm lover this got to be too much when the weather got particularly nasty. I decided to try an aquarium heater instead. It worked pretty good just keeping the water a constant temperature and the worms gathered in the area around the jar.

I hope some of these ideas help you find a winterizing option that works for your worm system.

Wednesday, October 3, 2012

How much food is too much food?


It has been a super long time since I have had the opportunity to add a new post to the website and when you wait this long it seems like the topic has to be extra special.  Over the last year it seems that the most common question I have gotten is how to feed their worms.  Clearly people are hearing the feeding caution so as not to over feed… but what exactly is too much food?  Or how do you know when to add more food? 

 There are many factors that influence how much a worm will eat and as a general rule, under ‘optimal conditions’ a worm will eat half its body weight per day.  However these optimal conditions can be quite illusive especially in a brand new bin.  A new bin may require additional moisture be added where an established bin may be too wet.  If it is hot or cold the worms will not be eating as much as they would if the temperatures were more moderate.  Then there is also the food that is being added to consider.  Is it nice wet mushy melon rinds or are we talking about carrot tops and potato pieces?  I am hoping the following will help the new vermicomposter feel confident feeding their new worm bin.

For this example I am going to assume you started your bin with 1 pound of red wigglers in a Rubbermaid type of bin.  If you started with more or less please modify the feeding volumes appropriately.  After you first add your worms to your new bin you may not need to feed them for 3 for 4 days.  When you set your bin up with layers of food and paper products then let it sit a few days you have pretty much spread out a huge banquet for your new friends.  It will take them a little while to catch up on the volume of food you gave them.  Like any of us, the worms are going to eat the best stuff first so the food scrapes that are harder to eat are going to be ignored until they get good and rotten.  Carrot tops are a perfect example.  Carrots are very dense so unless they are chopped very small it takes a lot more time to decay than something that is much softer.  Not that adding dense food is bad; it just takes longer to decay. 

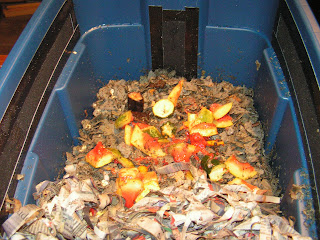
Paper Pulled Back and Food Spread Out
Your first feeding after adding your worms should be fairly light.  I would suggest just one double handful of food or approximately two cups of food.  The idea is that we want to add more yummy stuff so that the worms just go easily from the buffet to their normal eating routine.  To feed the worms pull back the paper that is covering them and spread out the food as evenly as possible.  The idea is that there are no big clumps of food in one spot.  Since they are going to just be slurping off the edges, the more surface area we can give them the better.  After the food is spread out, cover it back up with the moistened paper and you are done.

Unrecognizable Food - Time to Feed
I would check on the worms in about 2 days to see how they are doing.  If the food is still recognizable then give them another day or so.  Remember they still have a lot of food choices so they may not jump right into the new food like they will when your bin is more mature.  

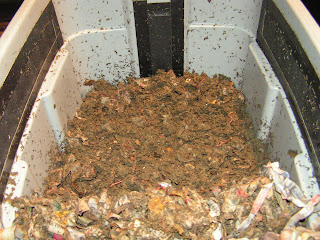
Two Week Old Bin - Just Turned Over
When the food doesn’t look like food anymore it is time to add more.  I would suggest that this is a good time to turn the bedding a little bit.  After you pull back the shredded paper mix up the bedding/worms/old food mixture a little bit.  This will give you an opportunity to check the moisture in the bin and add any if necessary.  Turning will also add oxygen and keep the material from getting too compact.  This is an aerobic process so air is good.  After turning the material add another double handful of food to the bin, spread it out and put the shredding paper back over the food.

Two Month Old Bin - Almost Time to Harvest
What is going to happen is that over the next few weeks you will see the bin material turn from just worms/food/paper to include a lot of castings that look like dirt.  You will also be able to feed the bin more food or feed it more frequently, whatever fits your schedule.  We feed our bins two heaping double hand full’s of food every 3 days but if you wanted to push it to four days it would likely be fine, the worms will just eat more of the shredded paper in your bin.   

If you ever need additional help please feel free to email us at wormfancy@live.com.

Monday, August 15, 2011

Do It Yourself Worm Bin

Worm Fancy has now had a few years of growing worms in Rubbermaid bins (check out the 'About Us' tab for pictures) and we have come up with a design that has been working very well. We want you to be successful so here is our design. Granted if we were rich enough to grow our worms in a whole bunch of Worm Factory 360's we would! So I still strongly promote the stacking systems for their ease of use and low maintenance... but for those of you out there that are limited in funds or you would rather re-purpose some of the materials you already have here are the DIY Bin Construction Instructions.

Materials needed:
• Drill
• 1/4 Drill Bit (or similar)
• Gorilla Tape (Not Duct Tape)
• Rubbing Alcohol
• Weed Block Filter Barrier
• Two 14 Gallon Dark Plastic Storage Bins (We use the Rubbermaid Roughneck)

Step#1 - Prepare the Bottom Bin

• Choose one of the bins to be the bottom and drill two parallel sets of holes. Measure from the bottom of the bin 2” and drill the 1st row of holes.
• Then drill the next row ½ inch above the 1st row. Repeat on the other side. (No filter barrier is needed on this bin.)
• The bottom bin is done.

Step #2 - Ready the Top Bin
• Take the second bin and drill 2 rows of parallel holes at the top of the bin. Measure from the top of the bin 2 inches down; drill your 1st set of holes.
• Measure ½ in below that 1st row; drill the 2nd row of holes. Repeat on the other side of bin.
• On the base of the bin drill holes all over the bottom to ensure good drainage. Space evenly about 1 inch apart. You can also place holes down the center (not shown but it is a good idea.
• Take one of the lids drill 2 rows of holes around the lid. Space them evenly about ½ inch to ¾ inch apart.

Step #3 - Filter Paper on the Inside
• Measure and cut filter barrier to cover the holes on the sides; bottom of the top bin. The fabric will help keep the worms and vermicompost in and flies out.
• Wipe areas that you will be adhering tape and filter barrier to with rubbing alcohol.
• Secure the barrier with gorilla tape or water resistant tape to finish the bin.
• Repeat this same process for the lid.


Step #4 - Stack the Bins
• Take the bin marked bottom and place 2 bricks or blocks of wood in the bottom of the bin.
• Take the other bin that has the filter barrier placed over the hole & set it inside the bottom bin.
• You are now ready to prepare you bins for your worms.

Now it is time to prepare the bedding for your worms.

Step #1 - Worm Bin Lasagna
• When your bin is built you will make alternating layers of 1 to 2-inches moistened bedding (cut up card board, shredded newspaper, shredded bills, ripped up toilet paper rolls or paper egg cartons) then a thin layer of kitchen scraps.
• It is good to sprinkle one tablespoon of soil from your yard in one of the food layers to add some microbes and add a little grit for the worms.
• Make about three alternating layers so you have about 4 to 6 inches material in the bottom of the bin.
• Cover the top layer of food waste with about 4 inches of shredded moistened newspaper.

Step #2 - Wait, Wait, Wait
• Once this is all together put the lid on the bin and let it sit for 3 to 5 days. You could add worms right away but it goes a long way to improving the composting process if you can let it sit for a few days before adding worms. When the worms arrive there will be lots of food ready to eat. They will feel so at home it will be like putting mints on their pillows.

Step #4 - Tossing the Worm Bedding Salad
• When you open the bin after it has sit, it will stink and there may be some mold. This is exactly what you want to happen.
• Take off the top layer of newspaper and mix up the layers below and probably add more water so it will be moist like a wrung out sponge.

Step #5 - Ready set Worms!
• Now you are ready for worms. Go to the Worm Fancy products page and order your worms, send us an email (WormFancy@live.com) or give us a call at 916-560-8023 to get a pound of worms.
• You will put the worms on the mixed up layer of bedding and food.
• They will probably be in a clump so gently pull them apart into smaller clumps.

Step #6 - Give 'em the Light Treatment
• The worms will move away from light so keep a light (NOT direct sunlight) on them till they disappear into the mix . Either do this step outside or under an overhead light.
• Leave them in the light for at least an hour to make sure there is no confusion where home is.
• Return all the moistened shredded newspaper on top of the worm bedding, replace the lid and you are done.

Please remember the worms will be adjusting to the new environment for a few days and you just provided them with lots of yummy food so you don't need to feed them right away. After they have adjusted for approximately 3 days you can start feeding them every other day or every 3 days. Watch the amount of food you add, it is way easier to overfeed than underfeed. If what you have added previously has not been mostly eaten, wait a day or so to feed again. Your worm population will grow to accommodate the food supply so be patient and eventually they will keep up with the kitchen scraps like champs.

Sunday, January 2, 2011

A Wormy Reflection on 2010

As we say good bye to 2010 I can’t help but reflect on our first year in business. We met a lot of new people that were very very cool. There were some rather unusual folks, like the lady that suggested that mucus from worms was good for the skin… um… ya… interesting. But with very few exceptions the people we met were either gardeners after the ‘Black Gold’ or people looking to live greener. There were lots of parents with their kids starting the next generation on composting and we got to see lots of kids in class rooms totally excited about having worms at school. We loved working with the Sacramento Zoo, Sacramento Utilities, Cal EPA and the many green teams out there looking to make a difference in their work place, home and school.

Worm Fancy has been working with Sacramento Utilities doing vermicomposting education at their FREE composting seminars and one of the facts we learned was that about 45% of residential waste is food waste. I was interested in knowing was how many pounds of food waste we (our Worm Fancy clients) helped to divert from the landfill in 2010. Now I know that not all of our worms survived but if I assume that the number of worms that multiplied replaced the number of worms that were sacrificed I could come up with a ball park figure. So, not including the herd that lives in my garage and eats about four 5-gallon buckets of food a week, I estimated that our new Worm Fancy worm parents diverted close to 15,000 pounds of food from the landfill. I think we have made a decent start.
I would like to share with you a few of the most common mistakes that I have seen new vermicomposters make so perhaps anyone that reads this will have a head start and miss some of the pit falls.

Most Common Vermicomposting Mistakes:
  • By far the biggest error that new worm mommies and daddies make is over feeding. It is difficult to underfeed your bin but SO easy to over feed, particularly when you are first getting your bin started. Rule of thumb is that if the food you fed hasn’t been mostly consumed (covered with worms or castings) then hold off on more food. There are many factors that affect the productivity of your bin, temperature and moisture being big ones, so don’t just assume your bin will process a set volume of food. Your worm population will grow to meet the demand but until then be mindful of the volume of food you feed.
  • Not enough drainage is the number two thing that we have seen. If you are using a manufactured bin they generally have plenty of drainage… this challenge is more for the Do-It-Yourself bin made out of Rubbermaid type of containers. These containers are great, we use them very successfully, but the design is important. Not enough holes in the bottom is the most common mistake. These rubber bins hold a lot of moisture so if you don’t have enough drainage you will have a swamp in your bin. If you need a copy of our DIY bin instructions please email us at WormFancy@live.com and we will be happy to get you started on the right foot.
  • Finally the ultimate misconception…. do NOT fill your bin with dirt. When people order worms I like to ask what kind of bin they are using. This has saved countless worms from their being sent to their doom. If someone mentions dirt I know it is time for an intervention. Composting worms are not soil worms. I understand people have seen worm bins that are mature and it looks like they are full of dirt… but what they are seeing are lots of castings which look and smell like soil so the confusion is understandable. People have asked if they can add worms to their compost pile... This is fine if it is a ‘cold’ pile, but DO NOT add them to a tumbling composter or stackable composter. It will get too hot and the worms that don’t escape will die.

From all of here at Worm Fancy we wish you a happy and prosperous 2011... And keep on composting!

Tuesday, June 29, 2010

Keeping Worms Alive in High Temperatures

We just got through our first triple digit days of the summer and our losses were fairly significant despite our initial efforts to keep our bins cool. We were not alone in our losses; I received several calls from other folks in the Sacramento area that have lost the worms in their bins due to the heat. I thought that it would be important to share some of the lessons learned so that those of you with outside bins can keep your worm populations alive this summer.

What happened…

I took off on Friday to visit some family and when I came back on Saturday I noticed that my garden was drooping despite the fact that the soaker hose had been running all night and all morning. That was my first clue that there could be a problem. I denied the situation a little longer so I could get dinner ready and put the kids to bed. Well once the angels were asleep I went to check the herd in the garage… It wasn’t a pretty sight.

The bin temperatures were in the 100’s and the worms were climbing out. Some of them made it to the floor and were dried up and others were huddled up together on the lids of bins below them. Many of the new bins that only had a few inches of castings were dry so we had to add water and mix in some ice cubes. The bins with thicker casting levels and lots of wet paper bedding on top of the worms and castings did much better.

The next morning as we were facing another 100+ day we put a sandwich bag of ice or a frozen bottle of water on top of the wet paper bedding in each bin. I checked the temperatures in the bins about 3 pm and they were almost 90 degrees and the ice was totally melted. We switched out the ice packs and this got them through the afternoon heat.

Thoughts for your outside bins…

If you keep your bin outside and the forecast is predicting temperatures in the high 90’s or 100’s I would suggest putting some ice in a baggie (so you are not adding excess water to your bin) or a frozen water bottle on top of your bedding in the morning and replacing it in the afternoon on particularly hot days. Since heat rises, the area under your frozen package will stay at a reasonably comfortable temperature for the worms. The worms will gather toward the center of the bin and away from the hot walls. A little prevention will be worth your time… TRUST ME… you do NOT want to open your bin and get a blast of dead worm smell. It is right up there with dead fish smell. Good Luck!!
Related Posts Plugin for WordPress, Blogger...

Brenda says...

Worm Fancy is the greatest place to get your worms in the Sacramento area. They have the best customer service!

Doug and Tammy, Yuba City

Tammy and I would just like to thank you for your professionalism and patience in answering all our questions about vermiculture. We are very interested in the difference it will make in our garden this year. Even our son will be using the new Worm Factory 360 in his science fair project that compares plants with and without worm castings. We're already noticing the better health with it. Our time with you was pleasant and we will be sure to return! Thank you again and we'll keep you posted. composted. :D

Scott R. from Sacramento

I picked my worms today and it sure looks like a lot more than 2 pounds worth. I ordered a pound from another vendor and you gave me 5 times more than they did.